
You’ve booked your flight and perhaps your cruise or hotel rooms for the Galapagos. Now you’ve decided to buy a camera but you’re not sure which is the best one. Or perhaps you’ve already bought a camera but you’re wondering what other camera gear you need to bring to the Galapagos.
In this post, I’m going to share with you EXACTLY what camera and camera gear to pack for the Galapagos.
I’ve taken 2 Galapagos cruises. On my first cruise, the majority of the passengers had a brand new Sony a7iii camera. This is the BEST semi-professional camera you can buy. But no one knew how to use it. They kept on asking the guide to help them take photos. Plus many had the wrong camera gear. I saw one person clean her camera lens with her shirt!
I’m writing this camera gear packing list for the Galapagos so you don’t make the same mistakes that my fellow passengers made. You’ll find out what camera, camera lenses, cleaning products, and other gear you need for your trip.
If you’re wondering what else to pack for your trip, you can get more ideas in this complete Galapagos packing list.
So let’s get started!
Disclosure: This post may contain affiliate links. As an Amazon Associate and a Bookshop.org Associate, I earn from qualifying purchases. Please see this website’s Disclosure for more info.
In This Post, You’ll Find…
Jump to the section that interests you the most.
1. Best Camera for the Galapagos
The Galapagos is one of the most amazing places to visit in Ecuador and perhaps even the world! So you need the best camera to take the best photos!
When looking to buy a camera for the Galapagos, you need one with the following features:
- Good autofocus so you can get those photos of birds in flight
- Image stabilization because you’ll sometimes be on a rocky panga moving up and down and trying to take a photo of a penguin or a blue-footed booby.
- Produces sharp images. You want to be able to see as much detail as possible of the iguana or red-footed booby.
- Lightweight because you’ll have to carry it on your excursions Mirrorless cameras weigh less than DSLR ones.
Should you get a DSLR or a Mirrorless?
The best type of camera for the Galapagos is a Mirrorless because most of the major camera producers (Nikon, Canon, Sony, Fuji) have stopped making DSLR cameras. They also tend to weigh less than DSLRs.
However, because many photographers are switching to mirrorless, you might be able to find a good deal on used DSLR cameras and lenses! A DSLR is also not a bad camera choice for the Galapagos.
Which camera should I buy for the Galapagos?
I think the BEST Galapagos camera for non-professionals is the Sony a7 III or the newer model, the Sony a7 IV.
Sony just makes the best cameras. The Sony a7 III was the camera that everyone but me had on my Galapagos cruise. Almost every non-professional camera user I’ve met since I started traveling full-time in April 2021, uses a Sony camera simply because it takes great photos and is relatively affordable.

The Sony a7 has great autofocus and produces sharp images at low light and when your boat is rocky. It’s got good image stabilization. You’ve also got an assortment of lenses to use at various price points. The a7 III is an older model so the price isn’t as high as the newer models.

I do not have a Sony camera. My camera is a Fuji XT-4. The latest version is the Fuji X-T5. I love my camera but I know that in terms of shooting photos in low light conditions, Sony is better. It also has better autofocus—it can focus on moving objects like birds better than my Fuji can. However, Fuji cameras are more fun and intuitive to use and they produce photos with stunning colors.
A lot of camera experts say it’s not which camera you get, it’s what lenses you use. So, let’s look at the best lenses for the Galapagos.

2. BEST Camera Lenses for the Galapagos
The most important camera decision you’ll need to make for the Galapagos is what lenses to bring. I have actually seen people recommend a simple average focal length camera for the Galapagos, which is often the lens that comes with your camera when you first buy it. This is called a kit lens and it is usually 28-70mm or 18-55mm.
Bring your kit lens to the Galapagos, but…
This lens is what most of my fellow shipmates had, and I think they chose the wrong one for the Galapagos. Most of the time, you’ll be taking photos of 2 subjects: wildlife and landscapes.
These are the lenses you need to get the best photos:
- Telephoto zoom lens (70mm – 300mm or 70-400mm) to take photos of wildlife.
- Wide-angle lens (10mm – 24mm) to take photos of landscapes.
Lenses can get pretty expensive. Expect to pay over US$1,000. If you can only afford one extra lens, go with the telephoto lens. During my 12-day cruise in the Galapagos, I used my telephoto lens 90% of the time. If I needed a wider shot, I’d often just use my phone or use my kit lens.
Telephoto lens
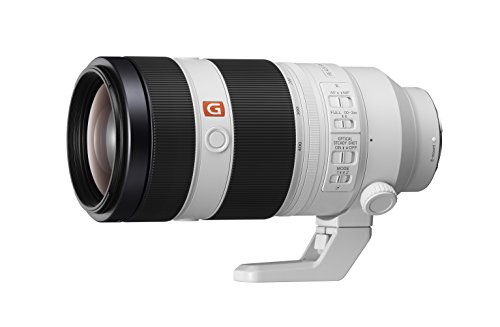
For the Galapagos, You ABSOLUTELY need a telephoto lens of at least 300 mm. There was only one time when I was on Fernandina Island that I wished I had a longer zoom and that was to get a better shot of the marine iguanas.
Yes, you can get close to a lot of animals in the Galapagos. But NOT close enough all the time. You’ll just be disappointed if you bring only a 28-70 mm lens and not be able to look at closeup images of a blue-footed boobie or Galapagos hawk. The photos I cherish the most are the ones in which I used my Zoom to get close-up shots of the animal.
There were only a few times when my telephoto lens wouldn’t focus on the animal because I was too close to it. Then I just had to stand back farther.
Here are my recommended telephoto lenses for Sony and Fuji cameras:
Wide-Angle Lens

The next camera lens you need for the Galapagos is a wide-angle lens for landscape photos. A wide-angle lens is usually 10-24mm or 12-24mm.
My wide-angle lens stopped working before my trip to the Galapagos. I’d been traveling through Central America with it and the humidity got to it and destroyed the lens. That was $900 wasted.
As a result, I had to rely on my phone to take wide-angle shots or just use my kit lens. But a phone camera is just not as good as a DSLR camera or mirrorless camera and my kit lens could not get all of the scenery into the photo.
Here are my recommended wide-angle lenses:
- Fuji 10-24mm lens (weather resistant – not the same one I bought)
- Sony 12-24mm lens
- Sony 16-35mm lens
Do you need to change your lenses all the time?
No, you don’t need to always be changing your lenses. I rarely changed lenses during my Galapagos cruise. About 90% of the time, I had my telephoto lens on my camera. I would use another lens when I visited Rabida Island, Bartolome Island, Tagus Cover, and Sierra Negra Volcano. Alternatively, I’d
Before an excursion, I often asked the guide which lens to bring. If it was to an island like Genovesa or North Seymour with a lot of wildlife and boring scenery, I’d take my telephoto zoom lens.
If it were an island with great landscapes like Bartolome or Rabida, I’d take a wide-angle lens or an average focal length lens. Like I said, my wide angle didn’t work, so I’d use the wide-angle feature on my phone or I’d just use my 24mm to 50mm lens.
You might be interested in these posts:
3. Tripod


A tripod is an optional item to pack for the Galapagos. I used my tripod only once. It was to take photos of flamingos on Isabel Island (Galapagos cruise of Western islands). The tripod helped. I could tell that the photos with the tripod were sharper than the photos without the tripod. I wish I had used it when I was on Fernandina taking photos of the hundreds of sun-worshipping marine iguanas.
The reason you might want a tripod is that it stabilizes your camera when you’re taking photos of objects far away or photos at low light when you need to slow down the shutter speed. Without a tripod in these situations, your camera will shake and your photos will turn out blurry or just not as sharp as they could be.
The problem with tripods is that they’re big and cumbersome to carry around, especially if you’re hiking up and down hills and over unstable surfaces.
That’s why I recommend getting a GorillaPod or a mini tripod. These can fit in the side pocket of your backpack or even inside your backpack.

4. SD Cards

You need to pack at least 2 SD cards to save your photos. Your camera should have 2 SD card slots. You want to use them both. Whenever you take a photo, you want it saved to both SD cards at the same time. This is in case one of your SD cards decides to play a cruel joke on you and stop working. At least, you have a backup SD card.
So always pack 2 SD cards. This is the SD card that I recommend:
SanDisk Extreme Pro 128 GB SD Card – The Extreme Pro SD cards download photos faster than the Ultra SanDisk SD Cards
Ideally, you should be downloading your photos from your camera to your laptop every night and then reformatting your SD card, which basically erases the photos from it, every night, so that you begin the next day with a blank SD card. If you do that, make sure you have a SD card reader.
However, if you’re not traveling with a laptop, you’ll need to keep all your photos on your SD cards and hope that nothing happens to them. My recommendation is to then bring at least 4 or 6 SD cards.
My roommate on my Galapagos cruise saved all her photos over 8 days onto 1 SD card. She said that every night she would delete photos that weren’t good. I can’t imagine looking at hundreds of photos of the same thing through a tiny viewfinder and trying to decide which ones to delete and which ones to save.
You can always fix photos that aren’t straight or are too dark or too light with photo editing software like Lightroom. My roommate could have been deleting her BEST photos! Wait until you upload them to your computer and try editing them before deleting them.
I only have 2 SD cards because I travel with a laptop and an external hard drive.
5. Camera Batteries
Another thing you want to make sure to pack is at least 2 batteries for your camera. Now the good news with the Galapagos is that excursions are a maximum of 2 hours. Often just 1.5 hours so you’re more than likely not going to use up all of your battery life by the time you get back to your boat.
However, perhaps the night before you were having too many drinks in the bar and forgot to recharge your phone batteries and the next morning your camera’s battery was dead.
Bring 2 camera batteries.
And don’t forget a battery charger or cable.
6. Camera Strap

If you need a camera strap for your trip to the Galapagos, I cannot recommend this Peak Design one enough. I love it!
It’s supposed to work with any camera brand, so it’s quite versatile. I have found the strap easy to adjust, durable, and comfortable.
Just watch several videos first on how to attach it to your camera before attempting to do it yourself. It’s a little different for each camera. And some videos teach you a way that’s more complicated than it needs to be.
7. Lens Cleaning Kit

Your lens is likely to get dirty or wet while you’re in the Galapagos, so you’ll want something to clean it with. Don’t use your shirt or your finger or a tissue! You will ruin your lens.
You must pack a complete lens cleaning kit with the following items:
- Microfiber cloths (at least 2)
- Spray bottle of cleaning solution
- Lens brush
- Lens Pen – My favorite cleaning tool!
- Rocket Air Blower
- Sensor Cleaning Swab Kit – It’s probably unlikely that you’ll need to clean your camera sensor. Usually, sensors get dirty when you’re changing lenses. But most new cameras have an automatic sensor cleaner function that cleans the sensor every time you turn it off

8. Extra Lens Cap

Another essential camera item to bring is an extra lens cap just in case you lose yours. It happened to me on my trip to Japan. When I was going through security in Los Angeles, I was made to take my camera out of my bag. In the process, the lens cap fell off. I had to buy a new one in Tokyo. Luckily, it wasn’t too difficult. But in the Galapagos, it will be impossible to find an extra lens cap. Without a lens cap, your lens will get scratched and ruined!
9. Silicone Gel Caps
![Dry & Dry 5 Gram [50 Packets] Premium Silica Gel Silica Gel Packets Desiccants Silica Gel Packs - Rechargeable Moisture Absorbers, Desiccant Packets](https://thebambootraveler.com/wp-content/uploads/2024/01/image-14.jpeg)
Humidity can destroy a camera and lenses. It can get humid in the Galapagos from January to May. So, bring some silicone gel packets with you to keep the moisture out of your camera and lenses.
I destroyed my camera and a lens while traveling through Central America because the moisture from the humidity got into my lens and camera.

Ecuador Travel Guide
Check out my Ecuador Travel Guide. You’ll find tons of travel articles to help you have a smooth and memorable trip to Ecuador! You’ll find tips on tours, itineraries, hotels and food!
10. Camera Bag

Another thing you want to get for the Galapagos Islands is a good camera bag. It shouldn’t be too heavy, but it should also be sturdy enough so that your lenses aren’t moving around too much.
I have Brevite camera backpack and I don’t like it. The top compartment collapsed and all my things like tripod, umbrella, and sunscreen fell down onto my camera and lenses. I can’t wait until I return to the United States to get a new camera bag.
These are my favorite camera bags:
- WANDRD PRVKE Lite Photography Bag – This bag is water-resistant and uses theft-resistant material. It comes with a laptop sleeve as well. But it’s rather pricey.
- Tarion Camera Backpack – This camera backpack is under US$100 but is the same style as the WANDRD PRVKE camera bag. I also like how inconspicuous it is—it doesn’t look like you’re carrying expensive camera equipment.
11. Underwater Camera for the Galapagos
You’ll regret not being able to take photos or videos underwater when you’re in the Galapagos. The marine life is exquisite!
You have several choices for taking photos and videos underwater:
- Your phone is stored in a waterproof case
- GoPro
- Insta360
Using Your Phone Underwater

If you want to use your phone to take photos and videos underwater, a waterproof phone case is essential.
However, not all cases are made equally good. You have to be careful which one you buy! Some leak and others make it hard to press the buttons on the phone through the case. The latter is what happened to a friend of mine—she kept missing the shot because she couldn’t press the button through her phone case.
The phone cases from Pelican have a good record of not leaking and pressing the buttons through the case is relatively easy. It takes decent photos as well. The other reason I like it so much is that it floats! Imagine your phone falling into the ocean. With the Pelican case, it won’t sink.
Using a GoPro Underwater
Another option for taking photos and videos underwater is a GoPro. The best one is a GoPro Hero 12.
You’ll also need a Go Pro Waterproof Case for when you use the camera underwater. Make sure the one you get is well-built so that water doesn’t leak into it and ruin the camera.
If you’re using your GoPro underwater, you’ll want to use a hand grip. This hand grip has a strap and it floats. It’s also lightweight and comfortable to hold onto. Great for snorkeling with your GoPro.
Insta 360 Camera

The latest camera gadget that people rave about is an Insta360. An Insta360 allows you to film in all directions at once. It’s popular with people who film themselves biking, skiing, diving, and doing other such sports. However, it’s also great to use as you’re walking through a forest or over a lava field like in the Galapagos. You’ll be able to get more in a shot than a simple GoPro or camera.
There are several types of Insta 360s you can get:
- Insta360 One is probably the best and most expensive one
- Insta360 X3 is the most popular
If you’re going to use your Insta360 underwater, you’ll need a dive case.

12. Take a Photography Course
You can have the fanciest and most expensive camera and still take the worst photos! It’s because you don’t know how to use your camera. So, before you head to the Galapagos, make sure you know how to use your camera.
Don’t make the same mistake that I made after buying my first DSLR camera. I bought my first Nikon DSLR camera two days before a trip to Cambodia. This was such a mistake! It didn’t give me enough time to learn how to use my camera. When I got to Cambodia, I was taking lots of terrible photos—too bright, too dark, too shaky, too crooked, or took blurry. Rarely did a photo turn out.
After my trip to Cambodia, I tried to teach myself how to use my camera. I read books and blogs and watched YouTube videos. I took my camera out and practiced taking photos. The photos for my next trip which was Vietnam weren’t that much better. It wasn’t until I took this online photography course with John Greengo through Creative Live that I FINALLY learned how to use my Nikon and take decent photos.
I also took a second course through Creative Live on how to use my Fuji camera. This was another great course. Creative Live has courses for each major type of camera:
13. Take a Lightroom Course
Another course you need to take is a photo editing course. The BEST course is one that teaches you how to use Lightroom Classic. Don’t waste your time with YouTube tutorials or figuring it out on your own.
A Lightroom Classic course will teach you the fundamentals of editing your photos so that you can straighten the crooked ones, darken the overexposed ones, lighten the underexposed photos, and brighten the dull ones. A lot of photos that my roommate on the Anahi Galapagos cruise deleted from her camera could have been easily salvaged with editing software.
When you take photos in the Galapagos, you’ll find that half your photo is too dark (underexposed) and the other half is just right. You’ll think that this is a failure. It’s not. It’s normal—you just need to lighten the dark part of the photo with Lightroom. Now you’ve saved hundreds of photos!
How about a Photoshop Course?
Photoshop is overly complicated. You don’t need it unless you’re a professional photographer. I can’t even completely figure it out.
14. Adobe Lightroom Software

To use Lightroom, you need to purchase a yearly subscription to the software through Adobe. It’s not cheap but it is completely worth it, especially if you’ve already spent thousands of dollars on a camera.
You’ve got a few choices:
- Photography Plan – Lightroom + Photoshop
- Adobe Creative Cloud Collection – This includes all of the Adobe programs such as Lightroom, Photoshop, Illustrator, and Premier Pro. But you don’t need all of these programs.
- Adobe Creative Cloud Collection for Students and Teachers – If you’re a student or teacher, you get the entire Adobe collection for 1/3 the price of the original price.
Final Thoughts
The Galapagos is one of the best places to visit in Ecuador and even the world, so make sure you pack the right camera gear for your adventure!
You can also check out my foolproof Galapagos packing list that includes EVERYTHING you need to pack for your trip—both Galapagos cruises and land-based, independent travel.
Regardless of what camera you buy, these are the MOST important camera items to bring (besides the camera):
- Telephoto lens
- Lens cleaning kit
- At least SD Cards
- At least 2 Batteries
- Camera and case for underwater photography
I hope you’ve found this Galapagos camera gear packing list helpful! If you have questions, feel free to ask in the Comment Section below! If you’ve found this post useful, feel free to share it on social media!
Thank you!
And have a great trip!
More Travel Posts on Ecuador:
- Top 40 Foods You’ve Gotta Try in Ecuador
- How to Get to Papallacta Hot Springs
- How to Extend Your Visa in Ecuador
- The Ultimate Food Tour in Quito
- Galapagos Packing List
- Best Camera & Camera Gear for the Galapagos
- Anahi Galapagos Cruise Review: Western Islands Tour B1
- Anahi Galapagos Cruise Review: Eastern Islands Tour A2
- 25 Books to Read on Ecuador
- 15 BEST Places to Visit in Ecuador
- 25 BEST Places to Stay in Quito
- 20 BEST Quito Tours
- 15 BEST Day Trips from Quito
- Quito Itinerary for Culture, Food & History Lovers
Are you on Pinterest?
Hey! How about saving one of these pins to Pinterest to read for later?
And feel free to follow me on Pinterest, where you’ll find lots of travel articles for everywhere around the world.


0 Comments