First-Timer’s Guide to Getting Around Manila

The most frustrating thing about traveling around the Philippines for me was figuring out how to get around Manila.
- Metropolitan Manila consists of nearly 13 million people and has a higher population density than Tokyo, Mumbai, and Paris.
- Traffic jams are notoriously bad. If there were a contest among Southeast and East Asian cities for worst traffic, Manila would win hands down!
- Public transportation is crowded and difficult to navigate. There aren’t that many public buses. Instead, there are privately owned jeepneys, which are cheap but can be intimidating for foreign tourists to use. Their routes also don’t show up on Google Maps. There’s a light rail system that is inexpensive, but it’s terribly crowded.
- The other method of transport that is popular in Southeast Asia, Grab (the ride-hailing service that’s like Uber), exists but I found it be unreliable (read more below).
- Taxis have a bad reputation for trying to scam passengers.
- I’ve been told by numerous locals to BE AWARE of pickpockets on the LRT and jeepneys. But I haven’t experienced being robbed yet (knock on wood!)
With all these shortcomings, I thought I’d give you some tips on how to get around Manila so that your time in the city can be as enjoyable as possible.
Disclosure: This post may contain affiliate links. As an Amazon Associate and a Bookshop.org Associate, I earn from qualifying purchases. Please see this website's Disclosure for more info.
In This Post, You’ll Find…
Manila Overview
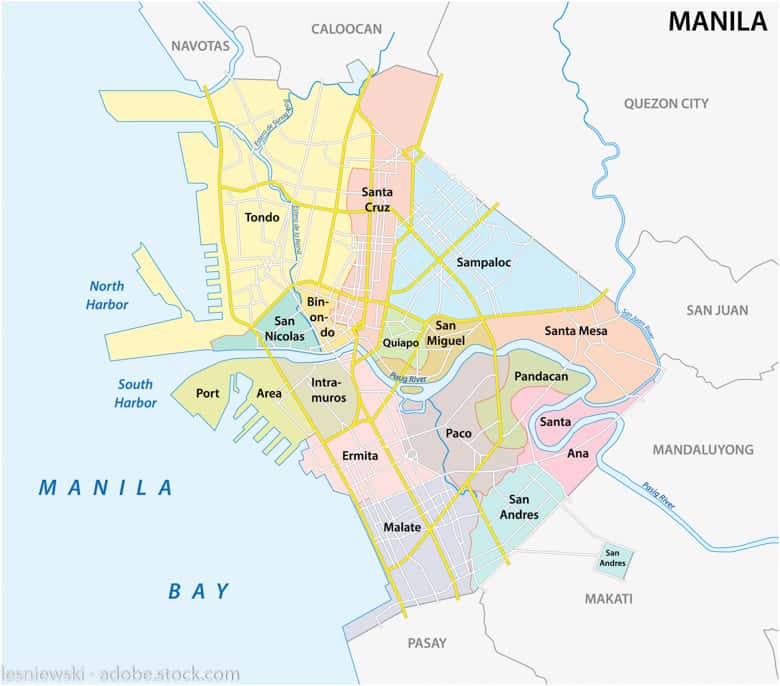
Metropolitan Manila is made up of 16 cities. The most important of these 16 is the city of Manila itself. As of 2018, it’s the most densely populated city in the world. The city of Manila encompasses the following areas:
- Intramuros– the oldest part of Manila; it was where the Spanish first settled when they colonized the Philippines; you’ll be doing most of your sightseeing here
- Ermita and Malate – older and grittier area; some hotels and hostels here
- Binondo and Santa Cruz – Chinatown; you can go on a great food tour here
Along with the city of Manila, other important cities or areas for tourists are the following:
- Pasay – the airport and bus station are located here
- Makati – business center; has some great hotels and hostels; great restaurants and bars; safer than other parts of the city
- Bonifacio Global City (BGC) – it’s actually not a city, but part of Taguig City; it’s newer and safer than other parts; lots of shopping malls
GRAB
Grab is Southeast Asia’s version of Uber. When you get to the Philippines, download the Grab App onto your phone.
Grab works a little bit differently from Uber. You can either add money to the App and pay for your rides that way, or you can pay the driver in cash at the end of your ride. I’ve always done the latter.

I used Grab throughout Singapore and Malaysia, and I found it easy, convenient, inexpensive. and reliable. In Manila, it was a different story. It was very unreliable for me. When I used Grab, I either had to wait for 30 to 45 minutes for it to pick me up or there weren’t any around to pick me up. I could never get a Grab during rush hour.
To get from Makati to the tourist area of Intramuros (old Spanish section of the city), expect to pay around 300 pesos (US$6). The price isn’t bad, but since traffic is so terrible, you’ll be stuck in the car for a long time.
Taxis
Another way to get around Manila is by taxi. But be aware that taxi drivers have a bad reputation in Manila for overcharging and not having change.

Before you get in a white taxi, make sure the driver either uses the meter or you negotiate the price beforehand. With Manila’s awful traffic congestion, I’d suggest negotiating the price instead of using the meter. You could be stuck in traffic for hours and that meter isn’t going to stop.
When I took a taxi from Makati to Rizal Park, the driver asked for 500 pesos (US$10). I was with someone who knew Manila well, and she bargained him down to 300 pesos (US$6). When it was time to pay, he didn’t have any change for a 500-peso bill.
City taxis are white and the regulated airport taxis are yellow. Jump to this section to learn how to get to/from the airport.
PRO TIP: Download these apps onto your phone for your trip to any country in Asia. They will make your life so much easier!
- Grab is the ride-sharing service that people use in Southeast Asia. It's a must-have for getting around Manila, Hanoi, Singapore etc. It's not so necessary on the smaller islands.
- Klook is a tour-booking website used by lots of travelers in Asia. You're more likely to book with an honest tour company through Klook than through anyone else.
- What's App is the best service to use for getting in touch with other travelers, tour guides, and businesses in the Philippines, Vietnam, Thailand, etc.
- Booking.com is the best website to use for booking accommodations in Asia.
- I have both the MAPS.ME and Google Maps apps on my phone. Sometimes Maps.Me works better than Google Maps and vice versa. Make sure to download your maps to your phone before you start your adventure so you can view them offline. If you switch SIM cards, you might lose your downloaded maps.
Light Rail + Metro Rail Train Lines
Manila has 2 elevated light rail lines (LRT) and 1 metro rail line (MRT).
I liked using the Light Rail Train (LRT) in Manila. It was the best way of avoiding Manila’s horrendous traffic. Don’t be intimidated into not taking it from stories of it being overcrowded. Yes, it is overcrowded, but it’s not unbearably so.
The LRT-1 (it shows up as a Yellow line on Google Maps) is an elevated train line that runs north-south from Roosevelt station in the north to Baclaran station in the south. Look for either of those two signs when entering the station and when on the platform to make sure you’re going in the right direction.
The LRT-2 (Blue line) goes east-west from Rector to Santolan.
There’s also an MRT line that goes from EDSA or Taft Avenue to North Avenue. The MRT is good if you want to visit the shopping malls of Manila.
To change from the LRT to the MRT, you have to leave the station and buy another ticket.

http://www.roomrent.ph/manila-map.html
My Experience Taking the LRT:
I took the LRT-1 a few times while in Manila. It can get crowded but I didn’t feel uncomfortable. It’s also super inexpensive (20 pesos US$.40 – that’s 40 cents!).
Sometimes when the train arrived at the station, I couldn’t get on because it was too crowded, so I had to wait for the next one, which turned out to be not crowded at all.

How to Use the LRT:
Step #1: Enter the station: Pay attention to which direction you’re going. To go north, you’ll take the train going to Roosevelt. To go south, you’ll look for signs to Baclaran. Before you even climb the stairs to the elevated train, look for the signs “Roosevelt” or “Baclaran” because you can’t just cross the platform to get to the other train. And for some stations, the entrance for Roosevelt trains and the entrance for Baclaran trains are on opposite sides of the street.
- At rush hour, sometimes you’ll see people lining up on the stairs and in the street to get into the station. Don’t worry! Just join the line! If you were in a Grab or a taxi, you’d have to wait even longer in traffic. Welcome to Manila!
Step #2: Go through a bag inspection: When you enter the station, a guard will be at the gate. He or she will ask you to open up your bag to make a cursory inspection. Not sure what they think they’re going to find with such a glance at the contents of your bag. But just go with the flow. One time, a guard asked me if I was from Iran (during the Iran-U.S. conflict). Was she trying to be funny?
Step #3: Buy your ticket: Sometimes you can buy your ticket from a machine, while at other times your only option is a ticket booth. I like buying from a person because you can ask questions, and you don’t have to stand at a machine trying to figure out how it works. Tell the person where you want to go and she or he will give you a green ticket.
- It cost me 20 pesos (40 cents) to go from Gil Puyat (closest station to Makati) to Central (near Intramuros) and 20 pesos to get to the Chinese Cemetery (9 stops).
- If you’re at a machine, buy a single journey ticket.
Step #4: Tap the ticket: As you go through the gate, you’ll need to tap or scan the ticket.
Step #5: Wait for the train: Wait in line on the platform in the area on the ground marked in yellow.
Step #6: Enter the train: There were a few times when I couldn’t enter the train because it was too crowded. I had to wait for the next one, which always turned out to be uncrowded.
- Watch your valuables when on the train and make sure to put them in front of you. I was very cautious when I was on board and held onto them for dear life.
- Also, if it’s really crowded and you need to get off soon, don’t go too far into the belly of the train. Stand near the door.
Step #7: Get off the train: I used Google Maps to know how many stops there were. The stops are announced, but the train announcer says them so quickly and with such a different accent that it was hard the first time I took the train to figure out what the heck he or she was saying.
- The only other way to know which stop you’re at is by looking at the signs at each station. They are in nice big letters.
- Also, look for signs telling you what the next station is going to be so you can prepare.
- When trying to make your way to the train exit, just say “Excuse me.” That’s what everyone else did and what my guide told me to say. People got out of the way for me.
Step #8: Exit the station: When leaving the station, insert your ticket into a machine at the gate.
PRO TIP: No one likes to think about insurance, but accidents do happen. I highly recommend getting travel insurance. During my travels over the past 2 years, I've been using SafetyWing for my insurance. They're very affordable for all ages, and digital nomads can use their insurance long-term.
Jeepney
My proudest moment in Manila was when I successfully managed to take a jeepney all by myself! They are so intimidating!
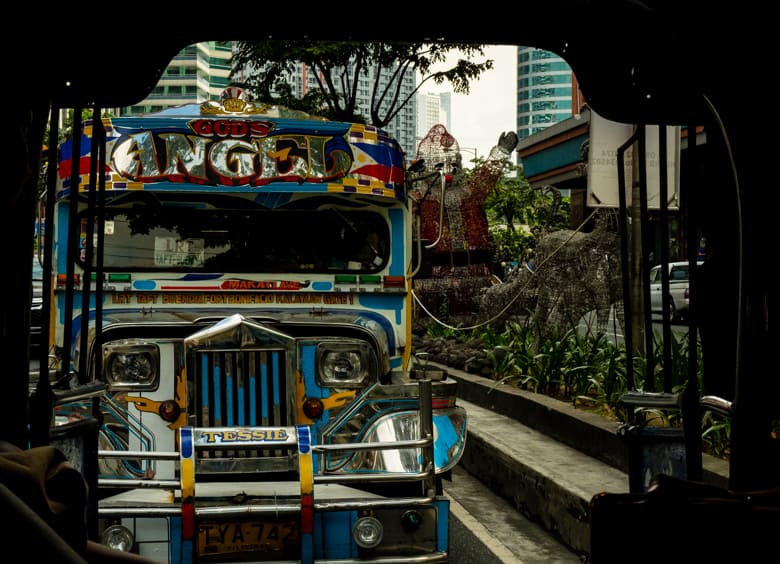
Jeepneys have a fascinating history that goes back to the end of World War II, when so much of the city was destroyed in the fighting between the Japanese and American-Filipino forces. Manila no longer had a transportation system, but the people still needed to get around. The only available vehicles were the jeeps that Americans left behind after the war. So, the locals took the jeep, extended the back part, and added long benches on each side of the jeep. Look closely at the front part of the jeep. It really looks like a military vehicle.
I love how the owners painted them and wrote religious names on the front, like St. Vincent or a woman’s name, like Ivy.
Here’s How to Take a Jeepney
Step #1: Flag down the jeepney: You can either stand on the side of the road and flag one down by waving your hand up and down the same way you would hail a taxi in the United States.
- The other way is that at popular stops like outside light rail stations, you’ll find a “barker” who helps the jeepneys fill up with passengers. Just tell him where you want to go, and he’ll flag the correct jeepney down for you and get you on one. You don’t need to pay him since he’s paid by the jeepney drivers to corral passengers. This is what happened to me when I was trying to get a jeepney at Gil Puyat LRT station.
- The jeepney also has the name of its destination and important stops on the side and front.
Step #2: Get in the Jeepney: You need to get on at the back of the jeepney and sit in a spot on the benches. Filipinos will squeeze together to make room for you. Don’t be rude and take up a lot of space.
Step #3: Pay the driver: Tell the driver where you want to get off, and then pay for the ride. The amount depends on your distance. I paid 9 pesos (18 cents) to go about 3 kilometers.
- Try to have exact change. Don’t hand big bills to the driver. It’s rather rude.
- Sometimes I saw just a driver on the bus, while at other times, there was a conductor who took the money.
- Passengers will pass their money down the line to the driver. You need to help out and pass the money along.
Step #4: Get off: You can know when to get off by following your GPS on your phone (Google Maps). My driver called out stops, but it was hard to understand what he was saying because he spoke so fast.
- To tell the driver that you want to get off, you need to say “Para po” (please stop).
- Watch your money and valuables. Pickpocketing happens on jeepneys.
Bus
Manila has a public bus system, but I couldn’t find one that ever plied a route I needed.
There are buses that go to the airport terminals, but since my flight left at 5:50 am, I never had a chance to use it.
Fares are between 100 and 150 pesos (US$3). You can visit this website here for bus routes and schedules.
However, this website for Manila buses seems to be more comprehensive.
Read More Articles on the Philippines:
Tricycles and Pedicabs
You can use tricycles and pedicabs for short distances.

Tricycles are more common outside of Manila than inside the city.

However, I saw lots of Pedicabs in Manila. They’re kind of scary to use at first because the driver doesn’t follow any traffic rules and you’re really low to the ground. It feels like you’re going to fall out or get run over by a bigger vehicle. There’s also nothing to hold onto. They work well when you need to go short distances.
I used one to go from Abad Santos Lightrail Station to the Chinese Cemetery and then back again. I was so tired and it was getting late that I didn’t want to walk the 8 minutes to the cemetery. When I asked the pedicab driver how much, he said 70 pesos (US$1.50). I said it was too expensive. Then another pedicab driver jumped in and offered 30 pesos (60 cents) and I took it. A Filipino said that 30 pesos was a fair amount. When I was returning, a guy offered 50 (US$1) and I got him down to 30 pesos.
PRO TIP: When you arrive in the Philippines, you can buy a SIM card at the airport. There are 2 companies used throughout the Philippines: Globe and Smart. Each of them gives you 10 or 12 GB of memory for 30 days for 1,000 pesos (US$20). I used 2 GB in 30 days.
If you have to "add load" (add minutes or data) for some reason, you can do it at a convenience store around the Philippines. Tell them you want to "add load". You need to give the clerk your phone # to complete the transaction (I usually store my SIM card # in my Contact List).
BUT that's not it. You then need to register your phone. If you have Globe, dial *143#. I usually have the store clerk or someone at my hostel or hotel help me complete the registration. If you don't register after every time you add data to your phone, the minutes and data disappear.
Walking
Given Manila’s horrendous traffic, sometimes it’s better to just walk! If you’ve never been to Asia before, it might be really intimidating. However, if you have, walking Manila’s streets isn’t THAT bad compared to Saigon or Phnom Penh. There are traffic lights with WALK/DON’T WALK signs or traffic cops that let you know when it’s safe to walk. There are also sidewalks (there are very few in Phnom Penh).
I walked 3 kilometers once from the light rail station to my hotel and survived to tell about it. It also took me less time to walk from Greenbelt Shopping Mall to my hotel (25 minutes for 1.7 km) than to take a Grab (1.5 hours for 1.7 km).
Another thing I found was that lots of locals told me such and such a place would be too far for me to walk and instead, I should take a Grab. However, I found out in the long run that it would have been better to walk to where I was going instead of taking Grab.
GETTING FROM THE AIRPORT TO YOUR HOTEL
Taking a taxi is the most efficient and most comfortable way to get from the airport to your hotel. There are two ways to do this: yellow metered taxis and white coupon taxis. I was told repeatedly by locals that the yellow ones are cheaper than the white coupon taxis. I was also warned NOT to take unofficial taxis from the airport.
Yellow Metered Taxis: The yellow metered taxis are the official airport taxis. They’re supposed to be more honest and safer than other taxis in Manila.
Here’s what I experienced: I exited Terminal 1 and saw a line of yellow taxis and a sign saying “Yellow Metered Taxis” to the left of the exit (don’t need to even cross the street). I went up to a taxi stand and told the woman who was working there where I wanted to go (have a printout of your hotel name and address). She handed me 2 pieces of paper. I then gave the paper to the driver of the first taxi in line. I had exited the airport later, so by the time I got to the taxi stand, all the other passengers had left. I think there is usually a line. I got in the cab and gave him a printout of my BOOKING.COM reservation with my hostel’s address on it. He seemed puzzled at first and looked at it for a long time. I got in at 7:15 am and arrived at my hostel in Makati at 8: 15 am. My ride cost me 494 pesos (US$10).
White Coupon Taxis: These taxis are not metered. They’re supposed to be safe and honest, but more expensive than the yellow metered taxis.
You tell them where you want to go and they charge a flat rate, which you pay before taking the taxi. I saw a sign saying “Coupon Taxis” across the street outside TERMINAL 1.
White City Taxis: These are the unregulated taxis that you find plying the streets of Manila. Many people have told me not to use these taxis as they’re notorious for ripping passengers off. My experience taking one in Manila confirms this.
Public Transportation from Airport: I know there is a way to take buses from the airport to various areas of metropolitan Manila, but I’m not an expert on this method. I also don’t recommend it if you haven’t been to Manila before. I’m going to recommend checking out the bus company’s website.
Final Thoughts on Getting Around Manila
I want to leave you with four important pieces of advice for getting around Manila:
- Plan for enough time and then some to get from point A to point B.
- Try to avoid traveling at rush hour
- And if you have to travel at rush your make sure you have an alternative mode of transport to Grab. You might find yourself having to figure out Manila’s public transportation system.
- Join a tour group instead of navigating the city on your own. I joined 3 tours and 2 of them taught me how to use the public transportation system in Manila. Without my guide, Dennis, I would have been too intimidated to figure it out on my own. I’ll leave you with a list of tours at the end of this post.
The best thing about Manila is that nearly everyone there speaks pretty good English, so if you get lost and need help, you can always ask someone.
More Travel Guides for the Philippines:
- Learn how to take public transportation and a Grab and taxi around Manila - First-Timers Guide to Getting Around Manila
- Manila Itinerary: 2 Days Exploring the Culture and History of Manila - In this guide, you'll get a detailed step-by-step itinerary for seeing the sights in Manila.
- Port Barton Itinerary: What to do for 3 Days in Port Barton - Find out how to discover the most beautiful beach in the Philippines.
- One of my favorite experiences in the Philippines was an island-hopping tour of Sibaltan. Get the details here: Sibaltan Tour: Finding Your Secret Paradise in Palawan, Philippines
- El Nido Itinerary: An Adventure of a Lifetime - Learn where to go, what to eat, where to see, and of course, what to do in El Nido.
- Bohol Travel Guide: Exploring the Natural Wonder of the Philippines will tell you exactly what to see and do in Bohol, how to get there, where to stay, and much, much more!
- Siquijor Itinerary: Exploring the Island of Fire will give you the skinny on everything you need to know to travel to Siquijor.
- Malapascua Itinerary: Plan Now! Go Later! will help you plan your trip to Malapascua and Kalanggaman Islands.
- Find out what my 15 favorite places to visit in the Philippines are.
- Solo Travel Guide for the Philippines will give you some pointers on how to best travel solo in the Philippines cheaply and safely and still have a kick-ass time!
Are you on Pinterest?
Hey! How about saving one of these pins to Pinterest to read for later?
And feel free to follow me on Pinterest, where you'll find lots of travel articles for everywhere around the world.


2 Comments
Submit a Comment
About the Bamboo Traveler

Welcome to The Bamboo Traveler, a travel blog dedicated to helping those travelers who want to dig deeply into the history, heritage, and culture of a place. Whether it’s through the pages of your passport or the pages of a book, I’ll help you travel the world and uncover the history, culture, food, architecture, and natural beauty of some of the world’s most fascinating places.


How to Get Around Manila Explore Manila easily with jeepneys for a local vibe, LRT/MRT for quick trips, and Grab for convenience. For short distances, try tricycles or pedicabs. Just watch out for traffic during rush hours.
This is really awesome. I have not been back in over 40 years. I’m sure a lot has changed but I can relate to the many things you wrote. This gives me confidence in making a trip – probably my one and only trip back to my roots. Thank you.